J2ObjC は使えるか?

Java プログラムを Objective-C プログラムに変換してくれる天下のグーグル謹製プロジェクト J2ObjC 。

興味を持ったので試してみた。

何はともあれビルド。

ビルド

公式のページに従う。

注意点としては・・・。

PROTOBUF_ROOT_DIR=/usr/local

を .zprofile あたりに追記。この時に

PROTOBUF_ROOT_DIR='/usr/local'

とやってしまうと文字列と判定されてしまうので、ビルド途上でおこられます。

並列ビルドも失敗しやすいようなので、まず

make -j4 dist

と最低限のコンパイルを片付けてしまい、必要に応じて

make frameworks
make all_frameworks

とするといいと思う。

Hello World

ビルドはとんでもなく時間がかかるので、すぐにできる j2objc, j2objcc を使ってハロワしてみよう。

公式ページにある Hello.java

public class Hello {
  public static void main(String[] args) {
    System.out.println("hello, world");
  }
}

j2objc Hello.java

すると同名の .m ファイル(Hello.m)ができる。


#define J2OBJC_IMPORTED_BY_JAVA_IMPLEMENTATION 1


#include "Hello.h"
#include "IOSObjectArray.h"
#include "J2ObjC_source.h"
#include "java/io/PrintStream.h"
#include "java/lang/System.h"


#if __has_feature(objc_arc)
#error "Hello must not be compiled with ARC (-fobjc-arc)"
#endif

#pragma clang diagnostic error "-Wreturn-type"
#pragma clang diagnostic ignored "-Wswitch"


@implementation Hello

J2OBJC_IGNORE_DESIGNATED_BEGIN
- (instancetype)init {
  Hello_init(self);
  return self;
}
J2OBJC_IGNORE_DESIGNATED_END

+ (void)mainWithNSStringArray:(IOSObjectArray *)args {
  Hello_mainWithNSStringArray_(args);
}

+ (const J2ObjcClassInfo *)__metadata {
  static J2ObjcMethodInfo methods[] = {
    { NULL, NULL, 0x1, -1, -1, -1, -1, -1, -1 },
    { NULL, "V", 0x9, 0, 1, -1, -1, -1, -1 },
  };
  #pragma clang diagnostic push
  #pragma clang diagnostic ignored "-Wobjc-multiple-method-names"
  #pragma clang diagnostic ignored "-Wundeclared-selector"
  methods[0].selector = @selector(init);
  methods[1].selector = @selector(mainWithNSStringArray:);
  #pragma clang diagnostic pop
  static const void *ptrTable[] = { "main", "[LNSString;" };
  static const J2ObjcClassInfo _Hello = { "Hello", NULL, ptrTable, methods, NULL, 7, 0x1, 2, 0, -1, -1, -1, -1, -1 };
  return &_Hello;
}

@end

void Hello_init(Hello *self) {
  NSObject_init(self);
}

Hello *new_Hello_init() {
  J2OBJC_NEW_IMPL(Hello, init)
}

Hello *create_Hello_init() {
  J2OBJC_CREATE_IMPL(Hello, init)
}

void Hello_mainWithNSStringArray_(IOSObjectArray *args) {
  Hello_initialize();
  [((JavaIoPrintStream *) nil_chk(JreLoadStatic(JavaLangSystem, out))) printlnWithNSString:@"hello, world"];
}

J2OBJC_CLASS_TYPE_LITERAL_SOURCE(Hello)

おお、Objective-C じゃん!

次に

j2objcc -c Hello.m
j2objcc -o hello Hello.o

として実行バイナリ hello をつくる。

% ./hello Hello
hello, world

おおお。

Java リバーシアプリを iPhone アプリに

そうこうするうちに dist フォルダに生成物ができていたので、これを利用して Xcode プロジェクトのサンプルを試してみた。
公式が Java reversi プログラムを Xcode 上でビルドするサンプルを紹介していたので、これにトライする。

ほぼそのままで動きました。

JRE.framework を JRE.xcframework にするくらいの変更でOK牧場。

すげ。


(続く)


Canonicalize XML in Java

はじめに

XML 署名の前に正規化 canonicalization を押さえておくべきだったな、とちょっと反省。

日頃使う html あたりを思い浮かべてもらえればピンとくると思うのだが、同じ内容を表現するのに元のコードは表記上はブレがある。
例えば、<tag> を <tag > と書こうが、ブラウザのパーサーは同じものと解釈する。
しかし、XML のデータ(構造)を丸ごと暗号化するような場合、これでは困る。
異なる数値データになってしまうからだ。
そこで、暗号化する前に何らかの仕方で表記のブレを統一しておきましょうという話になる。
これを正規化 canonicalization と呼んでいて、いくつかの方法が提案されている。

なお、よく C14N という表記が見られるが、これは anonicalizatio が14文字であることに起因する。

公開鍵基盤あたりの普及で電子データの長期保存のニーズは高まるだろうから、今後、この分野の知見は重要分野になってくるのは間違いない。

・・・とは思うのですが、この分野、ネット上の情報の質がちょっと・・・・。

例えば、この記事と同タイトルの英文記事があるのだが、そのサンプルがね。

普通に動かない(笑)。

説明はわかりやすいんすよ。

From the output, we can see that the Root node is removed in the canonicalized data, this is because the NodeFilter in NodeSetDataImpl has filtered this node. Next, the second my:Node has the xmlns:my node before Id node in the canonicalized form. This is based on the Canonical XML specification where the nodes should be in lexical order

出力から、正規化されたデータでルート ノードが削除されていることがわかります。これは、NodeSetDataImpl の NodeFilter がこのノードをフィルター処理したためです。次に、2 番目の my:Node には、正規化された形式で Id ノードの前に xmlns:my ノードがあります。これは、ノードが字句順に配置される必要がある Canonical XML 仕様に基づいています。

ここまで明快に具体的な正規化の方法を言及した記事はほとんどないっすから。
しかし、なんで(おそらくこの人の環境でしか動かない) tool なんてメソッドがソースに混入してるんだ???

車輪の再整備

よくわからない tool は、機能を読み取って変更。

オクテットストリームも InputStream でキャスト。

・・・

諸々する。

(ソースコード公開は少々お待ちを)

正規化例

修正して動かすと例えば、こんな結果が得られる。

何がどう変わったか?

<info/> → <info></info> あたりはわかりやすいでしょう。

よく見ると属性も変化してます。

要チェック。

その他

電子処方箋でも XML の正規化は必要になってきます。
このスレなど参照。

(続く)

Java XML 署名 API の使い方 -公式サンプル-

署名編の評判が良いようなので、次は検証(Validation)編。

と思ったのだが、オラクル公式サンプルが興味深かったので再掲。
レビューしてみる。

そのコードはこうだ。

import javax.xml.crypto.*;
import javax.xml.crypto.dsig.*;
import javax.xml.crypto.dom.*;
import javax.xml.crypto.dsig.dom.DOMValidateContext;
import javax.xml.crypto.dsig.keyinfo.*;
import java.io.FileInputStream;
import java.security.*;
import java.util.Collections;
import java.util.Iterator;
import java.util.List;
import javax.xml.parsers.DocumentBuilderFactory;
import org.w3c.dom.Document;
import org.w3c.dom.NodeList;

/**
 * This is a simple example of validating an XML 
 * Signature using the JSR 105 API. It assumes the key needed to
 * validate the signature is contained in a KeyValue KeyInfo. 
 */
public class Validate {

    //
    // Synopsis: java Validate [document]
    //
    //	  where "document" is the name of a file containing the XML document
    //	  to be validated.
    //
    public static void main(String[] args) throws Exception {

	// Instantiate the document to be validated
	DocumentBuilderFactory dbf = DocumentBuilderFactory.newInstance();
	dbf.setNamespaceAware(true);
	Document doc =
            dbf.newDocumentBuilder().parse(new FileInputStream(args[0]));

	// Find Signature element
	NodeList nl = 
	    doc.getElementsByTagNameNS(XMLSignature.XMLNS, "Signature");
	if (nl.getLength() == 0) {
	    throw new Exception("Cannot find Signature element");
	}

	// Create a DOM XMLSignatureFactory that will be used to unmarshal the 
	// document containing the XMLSignature 
	XMLSignatureFactory fac = XMLSignatureFactory.getInstance("DOM");

	// Create a DOMValidateContext and specify a KeyValue KeySelector
        // and document context
	DOMValidateContext valContext = new DOMValidateContext
	    (new KeyValueKeySelector(), nl.item(0));
	
	// unmarshal the XMLSignature
	XMLSignature signature = fac.unmarshalXMLSignature(valContext);

	// Validate the XMLSignature (generated above)
	boolean coreValidity = signature.validate(valContext); 

	// Check core validation status
	if (coreValidity == false) {
    	    System.err.println("Signature failed core validation"); 
	    boolean sv = signature.getSignatureValue().validate(valContext);
	    System.out.println("signature validation status: " + sv);
	    // check the validation status of each Reference
	    Iterator i = signature.getSignedInfo().getReferences().iterator();
	    for (int j=0; i.hasNext(); j++) {
		boolean refValid = 
		    ((Reference) i.next()).validate(valContext);
		System.out.println("ref["+j+"] validity status: " + refValid);
	    }
	} else {
    	    System.out.println("Signature passed core validation");
	}
    }

    /**
     * KeySelector which retrieves the public key out of the
     * KeyValue element and returns it.
     * NOTE: If the key algorithm doesn't match signature algorithm,
     * then the public key will be ignored.
     */
    private static class KeyValueKeySelector extends KeySelector {
	public KeySelectorResult select(KeyInfo keyInfo,
                                        KeySelector.Purpose purpose,
                                        AlgorithmMethod method,
                                        XMLCryptoContext context)
            throws KeySelectorException {
            if (keyInfo == null) {
		throw new KeySelectorException("Null KeyInfo object!");
            }
            SignatureMethod sm = (SignatureMethod) method;
            List list = keyInfo.getContent();

            for (int i = 0; i < list.size(); i++) {
		XMLStructure xmlStructure = (XMLStructure) list.get(i);
            	if (xmlStructure instanceof KeyValue) {
                    PublicKey pk = null;
                    try {
                        pk = ((KeyValue)xmlStructure).getPublicKey();
                    } catch (KeyException ke) {
                        throw new KeySelectorException(ke);
                    }
                    // make sure algorithm is compatible with method
                    if (algEquals(sm.getAlgorithm(), pk.getAlgorithm())) {
                        return new SimpleKeySelectorResult(pk);
                    }
		}
            }
            throw new KeySelectorException("No KeyValue element found!");
	}

        //@@@FIXME: this should also work for key types other than DSA/RSA
	static boolean algEquals(String algURI, String algName) {
            if (algName.equalsIgnoreCase("DSA") &&
		algURI.equalsIgnoreCase(SignatureMethod.DSA_SHA1)) {
		return true;
            } else if (algName.equalsIgnoreCase("RSA") &&
                       algURI.equalsIgnoreCase(SignatureMethod.RSA_SHA1)) {
		return true;
            } else {
		return false;
            }
	}
    }

    private static class SimpleKeySelectorResult implements KeySelectorResult {
	private PublicKey pk;
	SimpleKeySelectorResult(PublicKey pk) {
	    this.pk = pk;
	}

	public Key getKey() { return pk; }
    }
}

このコード自体はそんなにおかしくないと思うかもしれないが、対象となる xml ファイルも掲示されていてそれはこういうものだ。

<Envelope xmlns="urn:envelope">
<Signature xmlns="http://www.w3.org/2000/09/xmldsig#">
<SignedInfo xmlns="http://www.w3.org/2000/09/xmldsig#">
<CanonicalizationMethod xmlns="http://www.w3.org/2000/09/xmldsig#" Algorithm="http://www.w3.org/TR/2001/REC-xml-c14n-20010315#WithComments"/>
<SignatureMethod xmlns="http://www.w3.org/2000/09/xmldsig#" Algorithm="http://www.w3.org/2000/09/xmldsig#dsa-sha1"/>
<Reference xmlns="http://www.w3.org/2000/09/xmldsig#" URI="">
<Transforms xmlns="http://www.w3.org/2000/09/xmldsig#">
<Transform xmlns="http://www.w3.org/2000/09/xmldsig#" Algorithm="http://www.w3.org/2000/09/xmldsig#enveloped-signature"/>
</Transforms>
<DigestMethod xmlns="http://www.w3.org/2000/09/xmldsig#" Algorithm="http://www.w3.org/2000/09/xmldsig#sha1"/>
<DigestValue xmlns="http://www.w3.org/2000/09/xmldsig#">uooqbWYa5VCqcJCbuymBKqm17vY=</DigestValue>
</Reference>
</SignedInfo>
<SignatureValue xmlns="http://www.w3.org/2000/09/xmldsig#">eO7K1BdC0kzNvr1HpMf4hKoWsvl+oI04nMw55GO+Z5hyI6By3Oihow==</SignatureValue>
<KeyInfo xmlns="http://www.w3.org/2000/09/xmldsig#">
<KeyValue xmlns="http://www.w3.org/2000/09/xmldsig#">
<DSAKeyValue xmlns="http://www.w3.org/2000/09/xmldsig#">
<P xmlns="http://www.w3.org/2000/09/xmldsig#">/KaCzo4Syrom78z3EQ5SbbB4sF7ey80etKII864WF64B81uRpH5t9jQTxeEu0ImbzRMqzVDZkVG9 xD7nN1kuFw==</P>
<Q xmlns="http://www.w3.org/2000/09/xmldsig#">li7dzDacuo67Jg7mtqEm2TRuOMU=</Q>
<G xmlns="http://www.w3.org/2000/09/xmldsig#">Z4Rxsnqc9E7pGknFFH2xqaryRPBaQ01khpMdLRQnG541Awtx/XPaF5Bpsy4pNWMOHCBiNU0Nogps QW5QvnlMpA==</G>
<Y xmlns="http://www.w3.org/2000/09/xmldsig#">OqFi0sGpvroi6Ut3m154QNWc6gavH3j2ZoRPDW7qVBbgk7XompuKvZe1owz0yvxq+1K+mWbL7ST+ t5nr6UFBCg==</Y>
</DSAKeyValue>
</KeyValue>
</KeyInfo>
</Signature>
</Envelope>

これを NetBeans あたりで実行すると(ちなみに Java17 あたりでもほとんど手直しなしで動く)エラーが出てきて、そのメッセージはなかなか興味深い。

Exception in thread "main" javax.xml.crypto.MarshalException: It is forbidden to use algorithm http://www.w3.org/2000/09/xmldsig#dsa-sha1 when secure validation is enabled

要するに dsa-sha1 が現在ではセキュリティ的に問題あるので使えませんよ、と警告してくれるわけだ。

また、Signature 要素を探すとき doc.getElementsByTagNameNS メソッドを使っていて、なんでだ?と訝しんでいたのだが、対象となる xml を眺めてなんか納得。

Java XML 署名 API の使い方 -署名-

準備

公開鍵暗号方式に関して概念的でもいいからさらっておきましょう。
これがわかってないと何やっているかわからなくなると思います。
(プログラムのロジック自体はそれほど難しくはありません)

ワイは X509 関係の知識があやふやだったので

図解 X.509 証明書』あたりで確認。

特にこの図は素晴らしい。

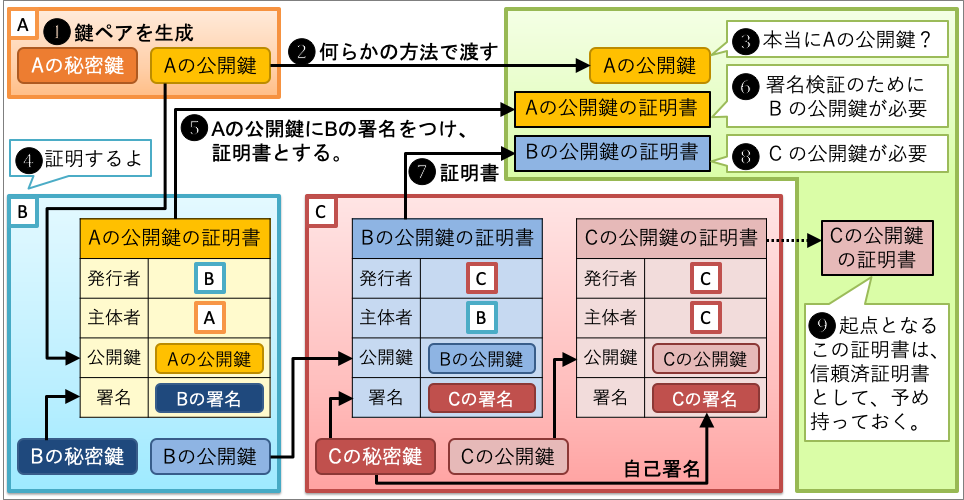
ただ、後半の自己証明書の作成は、使っているコマンドがモダンすぎて既存の Java コードでは正しく動かなかったりする。(『Mac で OpenSSL』など参照)

ここでも Mac で作業するので、openssl を入れておきます。

brew install openssl

X509 自己署名証明書(オレオレ証明書)を作成する

まずは、秘密鍵を作成。

openssl genrsa 2048 > privatekey.pem

なお、pem は base64 エンコードのテキスト形式です。バイナリ(der 形式)の秘密鍵が欲しい場合は

openssl pkcs8 -in privatekey.pem -outform DER -out privatekey.pk8 -topk8 -nocrypt

などのコマンドで変換しておきます。

次に CSR 証明書を作成します。

openssl req -new -key privatekey.pem -out csr.pem

以下のように質問されますので、適当に答えておきましょう。

You are about to be asked to enter information that will be incorporated
into your certificate request.
What you are about to enter is what is called a Distinguished Name or a DN.
There are quite a few fields but you can leave some blank
For some fields there will be a default value,
If you enter '.', the field will be left blank.

秘密鍵と CSR を使って X509 証明書を作成します。

openssl x509 -req -days 365 -in csr.pem -signkey privatekey.pem -out public.crt

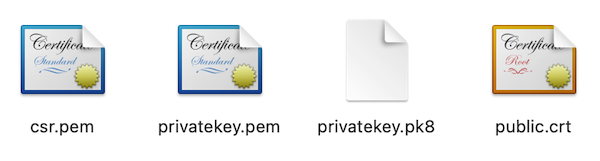
正常に各種証明書が作成されるとフォルダはこんな感じになると思います。

サンプルコード

これで準備が整ったので、コーディング開始。

なんですが、ネット上に参考になるコードがそれなりにあります。

今回は『JavaのXMLデジタル署名APIを利用してXML署名』のコードを使います。

ただし、記事作成時期が古く今となってそのままでは動かないため、以下のように改変。


public class XMLsignB {

    public static void main(String[] args) {
        System.out.println("signed XML");
        
        DocumentBuilderFactory dbf = DocumentBuilderFactory.newInstance();
        Document doc = null;
        try {
            doc = dbf.newDocumentBuilder().parse(new FileInputStream("product.xml"));
        }catch (SAXException ex) {
            Logger.getLogger(XMLsignB.class.getName()).log(Level.SEVERE, null, ex);
        }catch (IOException ex) {
            Logger.getLogger(XMLsignB.class.getName()).log(Level.SEVERE, null, ex);
        } catch (ParserConfigurationException ex) {
            Logger.getLogger(XMLsignB.class.getName()).log(Level.SEVERE, null, ex);
        }
        
        signature(doc);
        
    }
    
    
    private static void signature(Document xmlDom) {

    try {
        // 秘密鍵の取得
        PrivateKey privateKey = getPrivateKey();
        // 証明書の取得
        X509Certificate cert = getCert();

        // 対象要素の親要素にID属性を付与する
        Element targetNode = (Element)xmlDom.getElementsByTagName("ProductInfo").item(0);
        Element parentNode = (Element)targetNode.getParentNode();
        Attr idAttr = xmlDom.createAttribute("id");
        idAttr.setValue("ProductInfo");
        parentNode.setAttributeNode(idAttr);
        parentNode.setIdAttribute("id", true);

        // 署名情報の設定
        XMLSignatureFactory xmlSignFactory = XMLSignatureFactory.getInstance("DOM");

        // 変換アルゴリズムの作成
        ArrayList refTransformList = new ArrayList();
        refTransformList.add(xmlSignFactory.newTransform(Transform.ENVELOPED, (TransformParameterSpec)null));
        refTransformList.add(xmlSignFactory.newTransform(CanonicalizationMethod.EXCLUSIVE, (TransformParameterSpec)null));

        // ダイジェスト計算アルゴリズムの生成
        DigestMethod digestMethod = xmlSignFactory.newDigestMethod(DigestMethod.SHA256, null);

        // 参照要素の設定
        Reference ref = xmlSignFactory.newReference("#ProductInfo", 
                digestMethod, 
                refTransformList, null, null);

        // 正規化アルゴリズムの生成
        CanonicalizationMethod cm = xmlSignFactory.newCanonicalizationMethod(CanonicalizationMethod.EXCLUSIVE, (C14NMethodParameterSpec)null);

        // 署名アルゴリズムの生成
        SignatureMethod sm = xmlSignFactory.newSignatureMethod("http://www.w3.org/2001/04/xmldsig-more#rsa-sha256", null);

        // 署名情報の設定
        SignedInfo signedInfo = xmlSignFactory.newSignedInfo(cm, sm, Collections.singletonList(ref));

        KeyInfoFactory kif = xmlSignFactory.getKeyInfoFactory();
        X509Data x509Data = kif.newX509Data(Collections.singletonList(cert));
        KeyInfo keyInfo = kif.newKeyInfo(Collections.singletonList(x509Data));

        // 署名対象と秘密鍵の設定
        DOMSignContext dsc = new DOMSignContext(privateKey, parentNode);

        // XML署名の実施
        XMLSignature signature = xmlSignFactory.newXMLSignature(signedInfo, keyInfo);
        signature.sign(dsc);

        // コンソールに結果を表示する。
        TransformerFactory tf = TransformerFactory.newInstance();
        Transformer trans = tf.newTransformer();
        OutputStream os = new FileOutputStream("result.xml");
        trans.transform(new DOMSource(xmlDom), new StreamResult(System.out));
        //trans.transform(new DOMSource(xmlDom), new StreamResult(os));//ファイル書き出し

    } catch (Exception e) {
        e.printStackTrace();
    }

}

    /**
     * 秘密鍵の読込
     * 
     * @return
     * @throws NoSuchAlgorithmException
     * @throws IOException
     * @throws InvalidKeySpecException
     */
    private static PrivateKey getPrivateKey() throws NoSuchAlgorithmException, IOException, InvalidKeySpecException {

        byte[] key = readkeyFile("privatekey.pk8");
        PKCS8EncodedKeySpec keySpec = new PKCS8EncodedKeySpec(key);

        KeyFactory kf = KeyFactory.getInstance("RSA"); 
        RSAPrivateKey privateKey = (RSAPrivateKey)kf.generatePrivate(keySpec);
        return privateKey;
    }

    /**
     * サーバー証明書の読込
     * 
     * @return
     * @throws IOException
     * @throws CertificateException
     */
    private static X509Certificate getCert() throws IOException, CertificateException {

        CertificateFactory cf = CertificateFactory.getInstance("X.509");
        
        X509Certificate cert = (X509Certificate)cf.generateCertificate(new FileInputStream("public.crt"));

        return cert;

    }

    /**
     * バイナリファイルの読込
     * 
     * @param fileName
     * @return
     * @throws IOException
     */
    private static byte[] readkeyFile(String fileName) throws IOException {
        byte[] data = null;
        FileInputStream input = new FileInputStream(fileName);
        data = new byte[input.available()];
        input.read(data);
        input.close();

        return data;
    }

}

Java17 以上で動くと思います。

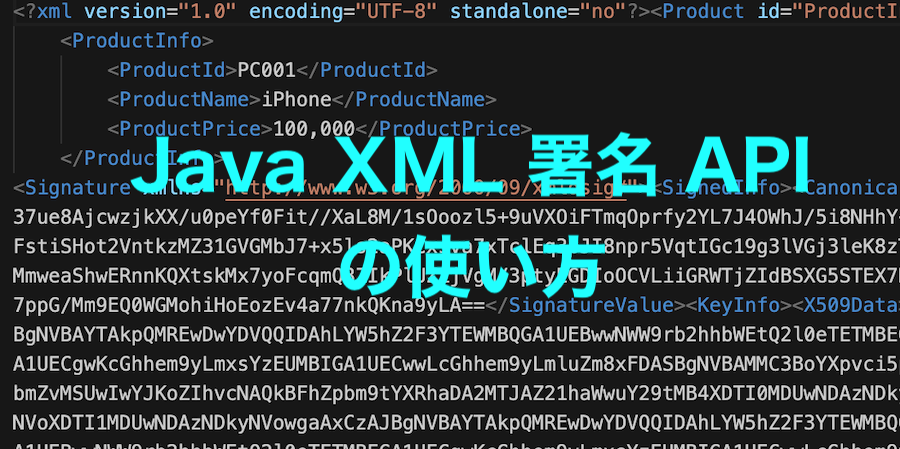
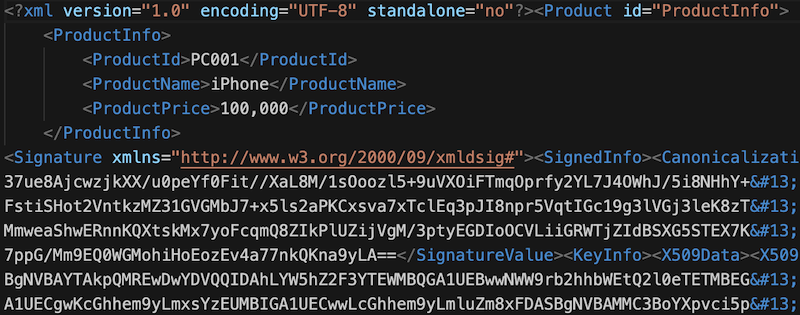
ファイル書き出しを選んだ場合は、以下のような result.xml が作成されます。


参考

実は、公式ドキュメントがわかりやすかったりする。

巷にある解説記事のほとんどは、ここのサンプルコードが素。

時間的に余裕のある人は、XML 署名の公式ページ読みましょう。こことか。
より理解が深まると思います。


(適宜情報追加予定)